Saturday, July 31, 2010

Helping Hudson - A Wheely Great Cause!

Meet Hudson. Hudson is 2 ½ but unlike most children his age, he has had a tough little life! Doctors realised he had an incomplete brain before he was born and as a newborn he was discovered to be legally blind. Hudson has recently been diagnosed with both Cerebral Palsy and Epilepsy. His mobility has been hindered severely by his disabilities, however his family and friends wish nothing more than to give him the chance to get moving on his own. Hudson needs a special Wheelchair/Walker, called a Kid Walker. This device will help get him mobile, allow him to play with his brother and sister, interact with other children his own age and give him independence in his day to day life!

It’s true when they say that a little goes a long way, and I’m here to tell you about how a simple purchase of some fun -filled paper craft tutorials can give freedom to a little boy!

When a group of Stampin’ Up! Demonstrators were asked for help they came to the rescue, ink and paper in hand, to work miracles. His story has touched so many people all over the world, so it's time to share it with you too!

There is a HUGE online stamping event taking place, called Helping Hudson - A Wheely Great Cause! The organisers have been working really hard, securing support, tutorials and donations to get this event underway. There are going to be three weeks of stamping fun for you to join in – come back as often as you can, there will always be lots more to see, do and learn. It kicks off on the 1st August and will run right through until the 22nd. You’ll find it at http://www.helpinghudson.blogspot.com/ or by clicking on the link at the top of the sidebar.

When you come on over to the blog you’ll find out all about Hudson, his family and his cause! But, more importantly, you can DO SOMETHING TO HELP HUDSON, at the same time as helping yourself learn how to make some great new paper craft projects.

How? By purchasing bundles of tutorials kindly donated by Stampin’ Up! demonstrators the world over. Each bundle has 10 fun-filled tutorials for just AU$10! And there are six themes to choose from: Bags & Boxes, Christmas, Kids’ Birthdays, Projects for Men & Boys, Punch Art & Scrapbooking. There’s even a FREE bonus bundle if you buy four or more. WOW how exciting! All proceeds go directly to help Hudson.

The Helping Hudson Crew will also be posting some awesome challenges throughout the three weeks. For a small donation you can join in and be in the running for some FANTASTIC Stampin’Up! Prize packs, kindly donated by Stampin’ Up! Australia (Aussie participants only, sorry) Also keep your eyes peeled for challenges at Just Add Ink and Stamp A Memory.

And we would love you to help spread the word too. Check out the ‘Spreading The Word’ page at the site for all you need to know to get the word out to as many people as you can.

C’MON LETS GET HUDSON MOVING!!


Photobucket

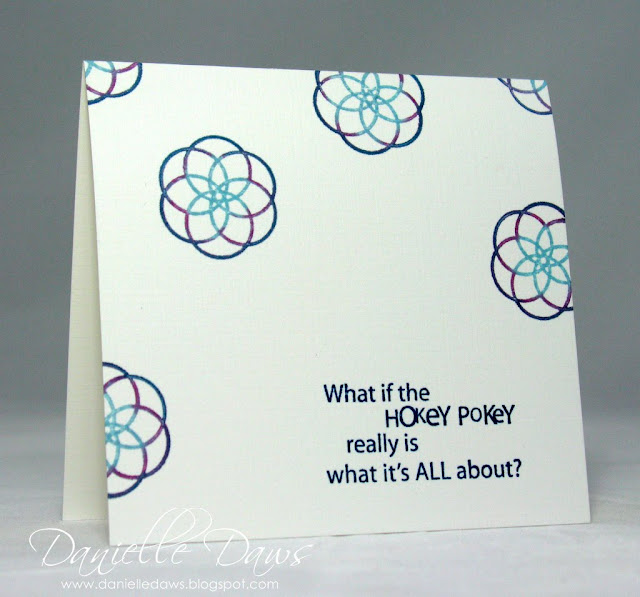
Hokey Pokey - CAS

One of my absolute favourite blogs to visit is Simplicity.  It's the gorgeous blog by Susan Raihala, and showcases her stunning, simple and elegant cards.  I get so many ideas from Susan!  I especially love visiting her blog to check out the latest challenge and all the beautiful entries.  And this week I have an entry for the One Layer Wednesday Challenge 14!


I've been itching to use this sentiment for ages, but didn't ever have the right occasion to use it.  And I need to give full credit to my upline Esther for suggesting Circle Circus to go with it.  You're a star, Es!

Thoughts, anyone??

Materials:
Stamp sets - Circle Circus, Smarty Pants
Cardstock - White Cambric Linen
Inks - Baja Breeze, Rich Razzleberry, Not Quite Navy


Photobucket

Bumble Bee Blue

I made this card for three different challenges - this week's challenge at All Things Sugar Nellie, which is BLUE; The Sugar Bowl layout challenge; and the Simon Says Stamp challenge to Go Dotty

I love this Sugar Nellie stamp - she's so cute! 

I've only used a few different inks in watercolouring this card - isn't it amazing how many shade variations you can get from one ink??


I added a little sparkle to her wings too...


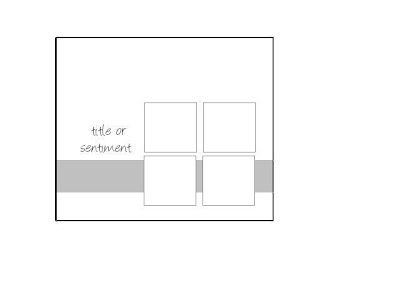
Here's the sketch I chose from The Sugar Bowl:


I'd love to know what you think!

Materials:
Stamp sets - Sugar Nellie - Bumble Bee
Cardstock - Watercolour paper, Confetti White, Baja Breeze, Kaisercraft DSP
Inks - Baja Breeze, Blush Blossom, Chocolate Chip
Accessories - Black embossing powder, Heat tool, Aquapainter


Photobucket

Friday, July 30, 2010

Just Add... A Man Card!! JAI28

I love this week's challenge...

Just Add... A Man Card!

Wanna know why I love it?  Because I find masculine cards really hard, and I'm counting on all the fabulous Just Add Ink participants we have to give me a heap of ideas!  I know, it's a bit selfish, but how cool is it going to be to have a gallery of awesome masculine cards at your fingertips??


There's even a colour combination to make it easier...


Materials:
Stamp sets - Greetings Eight, Sanded
Cardstock - Kraft, Chocolate Chip, Hand Drawn Bundle DSP (Level 3 Hostess)
Inks - Versamark, Chocolate Chip
Accessories - Dimensionals


Photobucket

Thursday, July 29, 2010

A Gift For You - Sugar Nellie

Another quick card share.  This one is for the challenge at Simon Says Stamp, which is to Go Dotty.  I think her dress definitely fits into that category!


Stay tuned... the next Just Add Ink challenge will be revealed at midnight!

Materials:
Stamp sets - Sugar Nellie - A Gift For You
Cardstock - Watercolour paper, Confetti White, Celebrate by Fancy Pants
Inks - Versamark, Blush Blossom, Creamy Caramel, Regal Rose, Certainly Celery
Accessories - Black embossing powder, heat tool, Aquapainter


Photobucket

More Watercolouring - Willow With Lantern

Yep, it's another watercoloured card.  I'm spending a lot of time trying to stop thinking!!  :-)  I'm loving colouring with Stampin' Up! inks at the moment... unfortunately I've been favouring the colours that are about to retire!  It's so unfair that I'm only now discovering my intense love for Sage Shadow...


This is a stamp called Willow with Lantern by Whiff of Joy.  Isn't it beautiful?  It's not a brilliant example of watercolouring though...


And I spent a ridiculous amount of time trying to get the light from her lantern looking right... did I succeed?


As always, I'd love to know what you think!


Materials:
Stamp sets - Whiff of Joy - Willow with Lantern, SU! - Baroque Border wheel
Cardstock - Sage Shadow, Watercolour paper, Handsome Hunter
Inks - Versamark, Blush Blossom, Sage Shadow, Handsome Hunter, Creamy Caramel, So Saffron, Real Red, Going Grey
Accessories - Black embossing powder, heat tool, Aquapainter


Photobucket

Wednesday, July 28, 2010

Monday, July 26, 2010

Upside Down Again!

I've got another Upside Down card to share!  This image is just so cute!  This one is to enter in the Sugar Bowl Challenge - the sketch is at the bottom of my post, and you also had to have blue on your entry.  I'm also entering it in the All Things Sugar Nellie Challenge 16, which is also to use blue.  I used Ballet Blue.  It's such a beautiful, vibrant colour.  I'm going to miss it!


You may have noticed that I've been doing lots of watercolouring lately.  It's the only thing that stops me thinking at the moment!


And here's the challenge sketch.


I'd love to know what you think!

Materials:
Stamp sets - Sugar Nellie - Upside Down by Diane Duda
Cardstock - Ballet Blue, So Saffron, Watercolour paper
Inks - Versamark, Blush Blossom, Creamy Caramel, So Saffron, Certainly Celery, Rose Red, Ballet Blue
Accessories - Black embossing powder, heat tool, Aquapainter, dimensionals, Big Shot, Finial Press embossing folder

Photobucket

Sunday, July 25, 2010

Colouring With Crystal Effects


Technique Tutorial
Colouring With Crystal Effects


Supplies:
Very Vanilla or Whisper White cardstock
Stamp Set - I used It's A Loop Thing
Versamark
Black embossing powder
Heat tool
Reinkers - I've used Taken With Teal, Rose Red, Elegant Eggplant, Pumpkin Pie, Creamy Caramel
Crystal Effects
Fine artist's brush
Baby wipes - to clean your brush between colours.
Small containers or an artist's palette - if you use airtight containers, the coloured mixture will keep for use again another time.

Step One
Stamp your images on your cardstock with Versamark, then apply black embossing powder and heat to set. 


Note - Using embossed images helps to keep the Crystal Effects where it's supposed to be.

Step Two 
You need to do this for each colour you're going to use.
Pour some Crystal Effect in a small container or on an artist's palette.
Enough to cover a 5 cent piece is enough to start with.


Add a single drop of reinker and gently mix. 
You can use your paintbrush to mix with, or a toothpick will also do.

Add more ink if the colour is too light, or more Crystal Effects if the colour is too dark.
This how it looks when it's all mixed.
Step Three
Use your fine artist's brush to gently paint your Crystal Effects mixture on to your image.

Paint gently and evenly to avoid air bubbles in your work. 


Note - Use one colour at a time on any image. 
Even though the image is raised because of the embossing,
you'll have more success if you wait for the first
colour to dry before beginning the next.

Complete the first colour on each image. 
If you only need one image for your project, consider making multiples to save yourself time later.

Step Four
Apply your second colour mixture once the first layer is dry (about 15 minutes).

 Your images are complete! 
Wait for them to dry before using on your project.


For my project, I cut out the cupcakes and added them to my base card. 


I hope you enjoyed my tutorial, and I hope you have a play with your Crystal Effects!


Download the PDF HERE.

Photobucket

Saturday, July 24, 2010

Upside Down!

I have a cute card to share with you tonight... well, I think it's cute!  The image I used is definitely cute!


It's a Sugar Nellie stamp called Upside Down and it's a Diane Duda design.  I just LOVE it!


You can check out Diane Duda's work on her blog.  It's ABSOLUTELY worth the time!  I wish I had that kind of creativity... *sigh*


I've entered this card in two challenges - this sketch challenge at Simon Says Stamp, and the All Things Sugar Nellie challenge at PCP to create a card for a child.


I'd love to know what you think!


Materials:
Stamp sets - Sugar Nellie - Upside Down by Diane Duda
Cardstock - Confetti White, So Saffron, Riding Hood Red, Watercolour paper. Celebrate by Fancy Pants
Inks - Blush Blossom, Creamy Caramel, So Saffron, Certainly Celery, Rose Red
Accessories - Black embossing powder, heat tool, Aquapainter, dimensionals


Photobucket

Friday, July 23, 2010

A Just Add Ink Sketch Challenge

For this week's Just Add Ink challenge, I dug out the current Level Three Hostess set called Hand Drawn Bundle. I've used the stamps and rub-ons from the bundle.


I stamped the cupcakes on Whisper White and then used Crystal Effects and reinkers to colour them.


I've been asked about colouring with Crystal Effects on a few different occasions, so I'll be posting a tutorial in the next few days.  Stay tuned!

In the meantime, why not visit Just Add Ink and link up an entry to this week's challenge?  Here's the sketch...
Materials:
Stamp sets - Hand Drawn Bundle - It's A Loop Thing
Cardstock - Rose Red, Whisper White
Inks - reinkers - Taken With Teal, Rose Red, Elegant Eggplant, Pumpkin Pie
Accessories - Loop to Loop Rub-ons, Crystal Effects, corner rounder


Photobucket

Tuesday, July 20, 2010

We Have A Kitchen!

I've had lots of people say to me: "Wow, you're building a house?  That must be so exciting!", and to be completely honest... I haven't actually been excited.  The past three years have been pretty drama filled just with my 'stuff', and then the house process started about 18 months ago.  From buying the block, to planning the house (sooo many plans!!), and now watching it finally come together... I guess it should be exciting... but I'm just drained! 

But now... NOW I'm excited!  Because our kitchen is 90% in and it's HUGE!!!  It looks so much better than I had visualised and I'm a big daydreamer, so that's saying something!

On to the photos!

The majority of the bench work is in "Latte" High Gloss wrapped vinyl, and the front of the breakfast bar and the kickboards is in "Urban Grey". The benchtop is a squareform laminex in "Mineral Harmony" and the splashbacks will be in a polished porcelain that matches the "Urban Grey" vinyl.


I'm so glad we chose Laminex over granite benchtops.  Thousands cheaper, and it still looks good!


Check out all our drawers!!  No more wasted cupboard space (you know those bits you just can't get to?).  21 drawers in total.  :-)


Okay, so this next picture shows just how pathetically excited I am... the builders have put a matching vinyl front on our pull out rangehood!!  I love these guys!


Downlights over the stove - they're built-in under the cupboards...


Check out the bins, Mum!  They're in a special drawer of their own!


This photo is taken from the corner of the lounge room - this post has photos of the same spot a few weeks ago...


This photo is taken from the corner of the dining space, facing the lounge room.


There are still a couple of bits to be finished... but it's looking AWESOME!!


The end is in sight...  HOORAY!!


Photobucket