Friday, April 30, 2010

Just Add Ink Challenge #15

Time for a sketch challenge at Just Add Ink!  I decided to play with my latest new addition - Lots of Bots for this challenge.


And here's the sketch.  Head over to JAI to see the brilliant DT work!


Materials:
Stamps - Lots of Bots, Polka Dot
Cardstock - Basic Gray, So Saffron, Barely Banana, Watercolour paper
Inks - Black Stazon, Basic Gray, Going Gray, So Saffron, Versamark
Accessories - Big Shot, Perfect Polka Dots embossing folder, Aquapainter


On another note, I've had a few people ask in comments they've left whether I'm going to the Stampin' Up! Convention in May - no, I'm not.  I'll be here in Hobart imagining what goodies are available in Momento Mall... ;-)

Photobucket

Thursday, April 29, 2010

FREE PASS WINNERS!!


Thankyou so much to everyone who left a comment on my UStamp Announcement post!  It's wonderful to know there are so many people dropping by my blog, and it's been great to get some new inspiration ideas too. 

I have TWO WINNERS to announce.  Out of 47 comments, Random Org chose numbers 41 and 13.  So the winners are...

Nadine   and   Robbie

Congratulations ladies!  I'll be sending you an email with the details later this afternoon.

Thanks again!!

Photobucket

Monday, April 26, 2010

More Vintage...

I have another vintage project to share with you.  This time it's a card that was inspired by this card by Megan McDonald, which was one of the winners of the last Just Add Ink challenge. 

Hope you like it!


Materials:
Stamps - Very Vintage Wheel, Echoes of Kindness
Card stock - Close to Cocoa, Chocolate Chip, Naturals Ivory
Inks - Chocolate Chip, Black Stazon, Watercolour Wonder crayons in Cameo Coral, Ruby Red, Old Olive, Always Artichoke
Accessories - Big Shot, Top Note die, aquapainter, Chocolate Chip ribbon, Pretties Kit, sponge, dimensionals

Photobucket

Sunday, April 25, 2010

A Birthday Card for my Hubby

Just a quick post to share the birthday card I made for my husband, Brian.  I'm a bit embarrassed to admit that this is the first card I've made for him!  His opinion of my work means the world to me, so I'm hesitant to make him anything in case he thinks it's silly.  But when I gave it to him he said: "Oooh, that's a good card!" 

I should give a bit of background.  Brian is not a natural complimenter.  It always seems to come out wrong!  The biggest joke we have about it is his way of rating things.  For instance, he's often described my cards (when I've gone search of his approval... again!) as either good, okay or not bad.  I used to be a Drama and English teacher, so to me, they aren't brilliant adjectives!  It took quite a while of me being disheartened and making a comment about it for Brian to clarify what he means by it. 

Good = I love it, I'd definitely buy it
Okay = Nice, I'd most likely buy it
Not Bad = A nice card, but I wouldn't buy it (usually because it's not the style he'd go for)

Ahhh, we've been together for nearly 9 years and I'm really only just grasping this concept!  Imagine my horror when Brian first saw me perform in a play 8 years ago - I asked him what he thought of my performance and he said... "Not bad"!!!  Apparently his complimenting has improved since then.  "Not bad" back then meant he really liked it...

Anyway... the card.  Brian has declared it to be good.  ;)


Okay, so it wasn't exactly a quick post!


Materials:
Stamps - Dreams and Dragons
Cardstock - Watercolour paper, Not Quite Navy textured, Soft Suede, Confetti White
Inks - Versamark, Soft Suede, Not Quite Navy, Mellow Moss
Accessories - Big Shot, Perfect Polka Dots folder, Aquapainter, Soft Suede polkadot ribbon, black embossing powder, heat tool, dimensionals


Photobucket

Friday, April 23, 2010

Just Add Ink #14 - Just Add Vintage!

Have you checked out this week's challenge at Just Add Ink yet?  It's Just Add Vintage and the Design Team projects are gorgeous.  I love vintage style cards and pages, but it's definitely not my forte!  I wish it was.  Come to think of it, I don't know if I even have a particular style...


As you can see, I'm just not brilliant with vintage!  It's too... straight.  lol


A few close-ups anyway...


I do still love my page though - it has my daughter Olivia on it!  She's turning 3 on Sunday... eeek!


Materials:
Stamps - Very Vintage Wheel, Echoes of Kindness
Card stock - Chocolate Chip, Naturals Ivory
Inks - Chocolate Chip
Accessories - Chocolate Chip ribbon, Twill tape, Pretties Kit, Pastels (with a brush), sponge, dimensionals


Photobucket

Wednesday, April 21, 2010

My Big Announcement!


Hi there!

I have some really exciting news to share - I'm a Guest Designer for the next round of UStamp - UStamp with Dawn & Friends!! "Hey, Big Shot!! Worldwide...that's how we roll!!" which launches on May 7!  I've known for a few weeks now and it's been really hard not to blab to everyone!  I've been busily designing my project and I can't wait to share it here!


If you don't know what UStamp is, it's a worldwide event that's run online where a new project is posted every day - with full step by step instructions!  UStamp is run by US Stampin' Up! Demonstrator Dawn Rapsas and features a host of wonderful designers from around the world.  The whole idea is to use and show Stampin' Up! products, but (and I love this bit) it's not about sales, it's about creating.  And this time the Big Shot is being featured. 


Click HERE to find out more about Ustamp and to join - it costs US$24.96 for 29 days of projects... And the blinkie above will be yours to post on your blog/website if you become a member.  BUT, if you're interested in winning one of TWO FREE PASSES I have to give away as blog candy, read on!

All you have to do is leave me a comment on this post!  I'd like to know...

What inspires you in crafting?

Leave your comment by midnight April 28th and I'll post 2 RANDOM WINNERS shortly after that.  Make sure you include your email address so I can get in touch with you if you win!

Good Luck!

Photobucket

Monday, April 19, 2010

We Have A Roof!

It's slowly coming together.  Last week saw our framework being mostly completed.  The actual roof is due to go on by the end of this week, and then the brick layers will be on site.  It's starting to look a touch bigger now!!


Photobucket

3D ESAD Challenge #1

Phew!  I managed to get this linked up with only 2 minutes to spare!  This is an entry for the 3D ESAD challenge number 1 and can be found on A Little Less Useless' Challenges.  It's a great project, but my album hasn't photographed too brilliantly.  Maybe because I was hurrying... hmmm... 


Materials:
Stamps - Always
Cardstock - Kraft, So Saffron, Not Quite Navy
DSP - Bella Bleu
Inks - Versamark, Chocolate Chip
Accessories - Chocolate Chip ribbon, Rose Red ribbon, So Saffron ribbon, Bright Delights rub-ons, Felt Fusion Too, Chocolate Chip corduroy buttons

Photobucket

Saturday, April 17, 2010

Need Another Hobby??

Are you feeling unfulfilled?  Do you need more than stamps, paper and ink in your craft life?  You're in luck!  I have a few suggestions for you... just click on the links!

Toilet Paper Origami 

I came across this on a fabulous blog called How about orange... - isn't it awesome??

And of course you can find tutorials... click here.

Ah yes, don't forget the book that's also available...


Yarn Bombing

Oh yes, it's a real hobby!  Check out the dedicated website...


Tree shaping... Patience really is a virtue!
The art of planting seeds on someone else's property without their permission.  I wish someone would randomly tend our garden!!


Photobucket

Friday, April 16, 2010

Just Add Ink Challenge #13

It's a Colour Challenge this week at Just Add Ink!  I've made another card this week, I must be due for some more scrapbooking soon!  Here's the challenge:


Aren't they gorgeous colours?  Make sure you check out our Design Team's work - they've outdone themselves yet again!  I was in a Baroque Border mood when I made this...


Simple and open to being used for different occasions.  Here's a close-up of the ribbon rosette - I'm loving these at the moment!


And yes, that is kitchen string... again!  The DT have a bit of a giggle every time I use kitchen string on a project.  Hmph!  Last time I'm going to share what I Can't Live Without!!  ;)


Materials:
Stamps - Baroque Border wheel
Cardstock - Barely Banana, Kiwi Kiss
Inks - Versamark, Chocolate Chip
Accessories - Chocolate Chip ribbon, Very Vanilla Ribbon, Old Olive ribbon, circle punch, Crystal Effects, clear embossing powder, heat tool, kitchen string 


Photobucket

Thursday, April 15, 2010

My Clever Girl...

I know every mother has a bias towards their own child... but today I'm going to rave on about mine.  ;)

My daughter Olivia is turning 3 next week and I think she's just amazing.  Not just because she's my daughter and the most beautiful person I've ever seen (there's that bias!), but because she truly is clever for her age.  Well, I think so anyway!  I'm going to share a few recent things that have left me feeling very proud of my little girl!

Olivia has been very quick to grasp the concept of letters, and is quite taken with seeing her name written down.  She began writing her own name last September and I posted her progress 2 months ago.  We had another name writing session a few days ago.  She knows how to write all the letters in her name, but sometimes gets a little confused about the order, so this was written with a little bit of prompting from me.  I think it's still impressive!!


And on the same day, she wrote mum for the first time - no prompting.  I was really impressed...


But I was absolutely gobsmacked when only 2 days later, she showed me this...


Yep, she's my clever girl!


Photobucket

Monday, April 12, 2010

Olivia in Black and White

Well, I finally completed the scrapbook page that I started for the Just Add Ink #12 Challenge.  When I was trying to complete it for the challenge, I just couldn't get it working the way I wanted it to.  Nothing seemed right and I just couldn't get the look I was after.

So I left it for a couple of days and when I came back to it, I realised that what I wanted was a subtle background... and none of the DSP's were doing the job.  So I created my own subtle DSP using my Baroque Border wheel with a Versamark ink cartridge - I know, they're not for sale!  I'll post a tutorial on how to make one in a few days. 

But for now, here's my completed page!  The photo is of my almost 3 year old daughter, Olivia.


I'm really happy with how it turned out - I'd love to know what you think!

Materials:
Stamps: Baroque Border wheel
Cardstock - Kraft, Not Quite Navy, So Saffron, Chocolate Chip
Designer Series Paper - Bella Bleu, Raspberry Tart
Accessories - On Board So Tweet, Rose Red Ribbon, So Saffron Ribbon, Chocolate Chip corduroy button, Scallop Border punch white gel pen


Photobucket

Big Shot Tutorial - Top Note Box


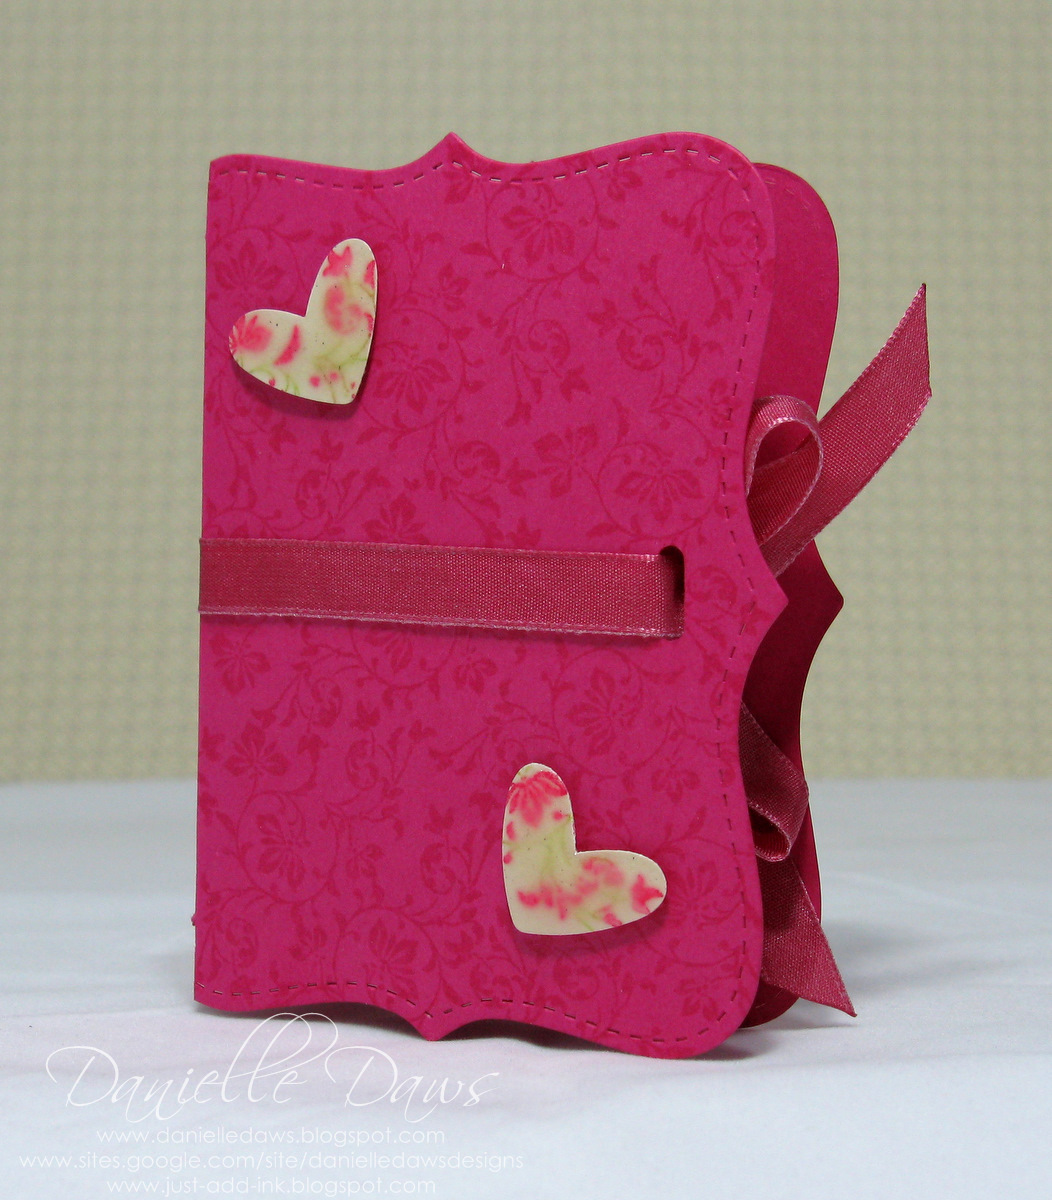
I shared this box in my previous post, and today I'm sharing a step by step tutorial on how to make it.  I want to be really clear - I didn't design this!  There are lots of variations of this box on the internet, I've just re-done this in centimetres rather than inches.


Big Shot Tutorial
Top Note Box

Supplies:
Big Shot
Top Note Die
Horizontal Slot punch
Adhesives
Ribbon
2 pieces of card stock -
  • 1 cut to 14cm x 20.5cm
  • 1 A5 size/half an A4 sheet (15cm x 21cm) scored down the centre to make an ordinary sized card (15cm x 10.5cm)


Step One
Score your 14cm x 20.5cm piece of cardstock. 
On the long side, score at 2.5cm, 9cm, 11.5cm, and 18cm. 
On the short side, score at 2.5cm and 11.5cm.
Step Two
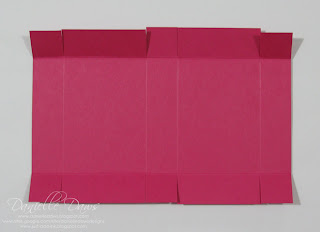
After scoring, cut the score lines along the long sides up to the 2.5cm score line (this will make the tabs that will hold the box together).
Step Three
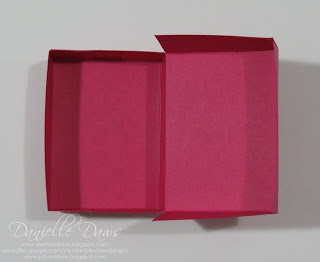
On one side, glue four of the tabs (to the inside) to form a basic box. 
On the other side, glue the remaining two tabs (to the inside) to form the top of the box. 
As shown in photo.
Step Four
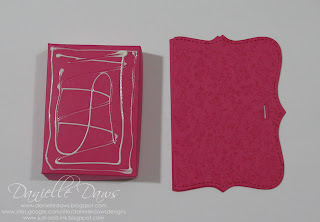
To make the Top Note top and base for your box, you need to run a folded card through the Big Shot.  
Lay your folded card on the Top Note Die so the score line sits just below the perforation marks on one side. 
Run through your Big Shot - this is how it will look when it comes out.
Step Five
Cut the card in half on the score line. 
You now have your top and bottom panels for your box. 
If you want to stamp or embellish your panels, now is the time to do it.
Step Six
Use the Hoizontal Slot punch to punch slots on the outer edge for the ribbon to go through. 
Attach the top and base panels to your box - I've used Tombow glue. 
The top panel should go on the part of the box that only has two tabs attached as the box will open and close more easily this way.
Step Seven
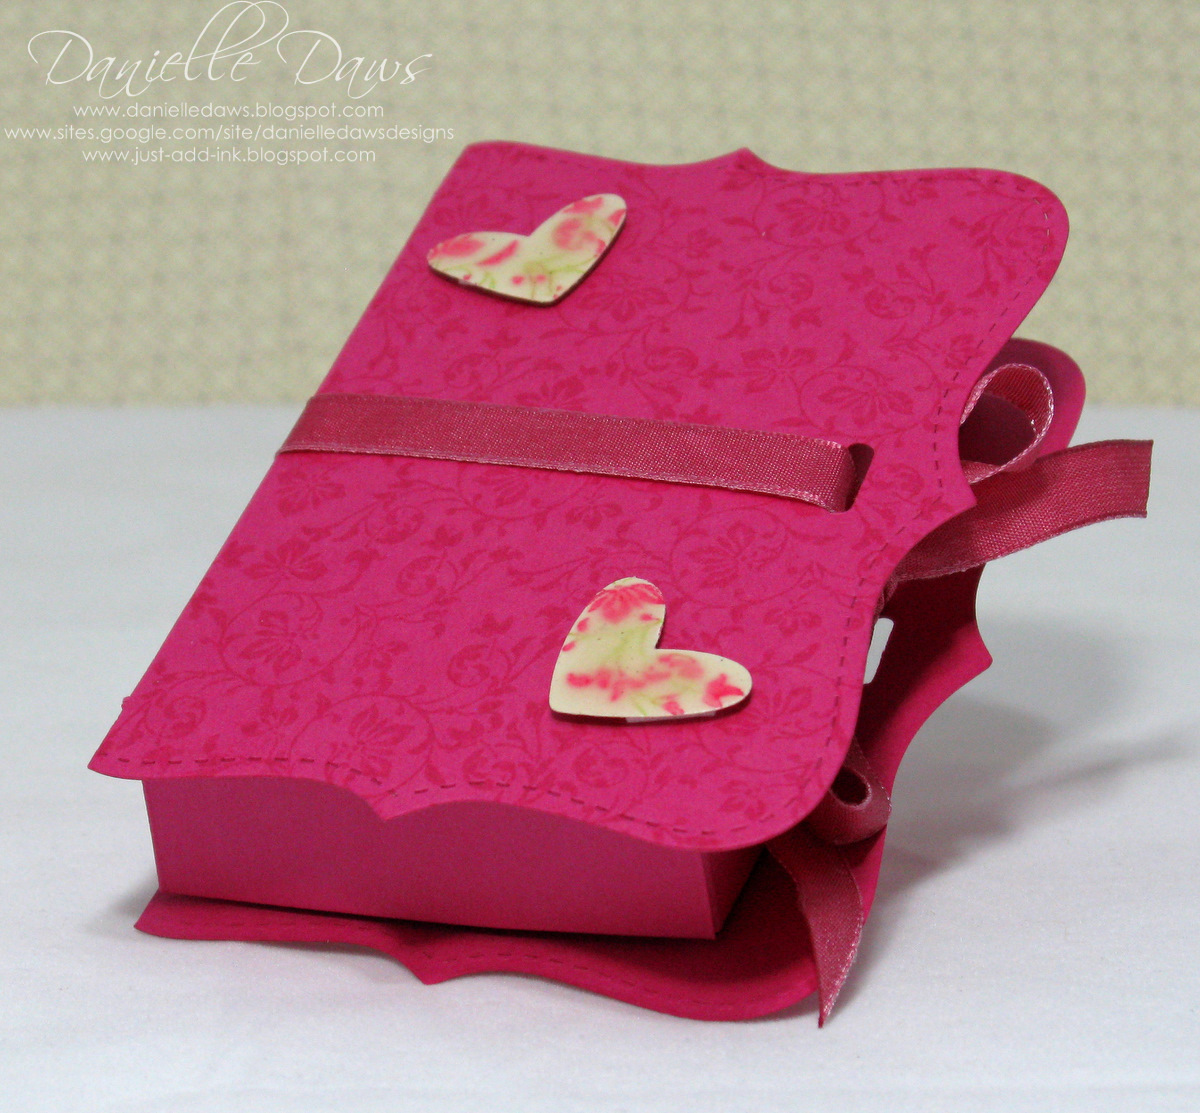
Use Sticky Strip or Snail Adhesive to attach your ribbon to the back edge of the box. 
Leave the rest of the ribbon unglued. 
Add any extra embellishments.


You're finished!


Finished Top Note Box


I hope you found this tutorial useful!

To see my other tutorials, click HERE.


Photobucket