Thursday, August 25, 2011

Sewing For A Willing Model...

Okay, you caught me out... my "willing model" is none other than Olivia's Jemima doll.  :-)  But at least she'll pose for a photo wearing the reversible skirt I made her!!


Yes, that's right, I have indeed gone mad... I decided to sew a teeny tiny reversible skirt for Olivia's doll.  I used exactly the same tutorial from my last postThe Simple Reversible Skirt Tutorial from Fashioned By Meg.  The only thing that changed was the material size.  I used two pieces of material measuring 12" x 5".  Perfect for Jemima.


I think it's kinda cute.


And now for the matching skirt for my unwilling model... who again declined to try on this skirt.  Hmph!


And the moral of the story??  I am a glutton for punishment... AND these skirts are so darn easy!


Photobucket

Wednesday, August 24, 2011

A Little More Sewing - Reversible Skirts

There are lots of fabulous reversible skirt tutorials out there, but The Simple Reversible Skirt Tutorial from Fashioned By Meg was just what I needed to have a go.  These are so easy!  I tried to get Olivia to try them on for me so I could take some photos but she declined.  Apparently she only likes them "a tiny bit"... *sigh*  Well, I think they're cute.  And I think I did a darn good job for my first go!


I decided to keep one side plain.  I don't know about anyone else, but we always seem to have the problem of too many patterns amongst Olivia's clothes.  Sometimes you just need a plain skirt.  :-)


I used a double row of stitching along the bottom instead of adding a trim.  Hmmm... my sewing is a little bit CAS too, isn't it?!


These waistbands couldn't be easier...


Thanks so much to Meg from Fashioned By Meg for the fabulous tutorial!


Photobucket

Monday, August 22, 2011

Birthday Anya II

I was lucky enough to win the gorgeous Birthday Anya II during the TGF Birthday Blog Hop (preview) earlier this month... isn't she cute?


So I coloured her up for a couple of challenges, and I used the luscious Peacock 15mm Satin Ribbon from Sew Sweet - it's a perfect match for Stampin' Up! Tempting Turquoise.  


Here are the challenges:


Thanks for visiting!  :-)

Materials:
Stamp sets - TGF Birthday Anya II 
Cardstock - White Cambric Linen, Whisper White, Regal Rose, Tempting Turquoise
Inks - Memento Tuxedo Black, Prismacolor Pencils
Accessories - OMS, Blending stumps, flourish die from MFT, Peacock 15mm Satin Ribbon from Sew Sweet


Photobucket

Saturday, August 20, 2011

Distress Stains By Tim Holtz

You might have noticed that I've been using the Tim Holtz Distress Stains on a few projects lately.  They'll be back in stock at Craft-A-Lot very soon and I can't wait to get my hands on some of the new colours!  I really wasn't sure what I'd use them for originally, but I'm finding myself reaching for them quite often.  They're fabulous for covering a large distance with colour quickly, and one of my favourite things to do with them so far is to use a scrunched up tissue to lightly dab off some stain to create an easy textured look - see this post to see what I mean.

There are a rapidly growing amount of tutorials becoming available online, and I thought I'd share my favourite 3 with you.  I did quite a bit of research when I first got the stains, purely because I had no idea what to do with them!

A brilliant video from Tim Holtz showing the difference between Distress Inks, Re-inkers and Stains, plus some cool techniques.  Please visit the original blog post HERE to leave any comments on this video.


Another one from Tim Holtz showcasing the new Distress Stains.


An awesome video of artist Dyan Reaveley creating a double page spread in her Art Journal (she uses the Distress Stains). The BEST tip I learnt from this video is to WET your page BEFORE applying the Distress Stain for a more even coverage.


I hope you find these videos as useful as I have!


Photobucket

Thursday, August 18, 2011

Art Journal - The Girl In Me

This week's theme is The Girl In Me, and we were asked to "Create a spread or a page using the concept of hand-drawn girls. I want you to actually draw a character in your book!"  Eeek!  There's a HUGE reason I watercolour stamped images... I can't draw my own!


I used my new Distress Stains and inks, and I had another go with my Derwent Inktense Pencils.  I'm a complete novice with them, but I'm enjoying learning!

Thanks for stopping by!


Materials:
Cardstock - Watercolour paper
Inks - Derwent Inktense Pencils, Distress Stains
Accessories - Aquash water brush


Photobucket

Tuesday, August 16, 2011

Wanna Win These Babies??

WIN this fabulous Unity Stamp June KOTM and the Tim Holtz Trinket Box...

HOW? Once we get 100 LIKES on Craft-A-Lot's Facebook Page, we will randomly draw a winner for this crafty-licious prize!!


And don't forget to visit the Craft-A-Lot Online Store to stock up on your favourite products (like the delectable new Gorjuss stamps... that's right, there have been another TWELVE released...)


Photobucket

Monday, August 15, 2011

Naughty And Nice In White

I had a go watercolouring with my new Distress Stains, and I thought I'd share how it turned out.  They're quite lovely to colour with, but I need a bit more practise to get used to them completely.  The stamp is one I just got in from Craft-A-Lot called Naughty And Nice (The Greeting Farm), and the White Seam Binding is from Sew Sweet.


I'm not completely happy with the skin tone, but I think that the new Tattered Rose Distress Stain will solve that problem for me.  :-)  What I used for this image was a mixture of Antique Linen and Spun Sugar.


And here are the challenges I'm entering...


Thanks for visiting!

Materials:
Stamp sets - The Greeting Farm Naughty Or Nice (from Craft-A-Lot)
Cardstock - White Cambric Linen, Watercolour paper
Inks - Distress Stains (available soon from Craft-A-Lot) in Antique Linen, Spun Sugar, Broken China, Faded Jeans
Accessories - White Seam Binding from Sew SweetBlack embossing powder, heat tool, Aqua painter, dimensionals, Big Shot, Nestabilities


Photobucket

Friday, August 12, 2011

Self Publishing

In November last year, I was thrilled to have a few cards accepted for publication in a craft magazine. For me, it was all about being validated. I'm not very good at self-validation. And I hoped it would be the beginning of something wonderful. I naively told friends and family about it...

After nearly 8 months of my cards being put on the back burner, and no real indication of when they might actually be used, I withdrew my cards and had them returned. Why? Because at least half of the products I've used on these cards are either retired, or are about to be retired. I definitely didn't want to be the fool in the magazine with cards using discontinued stock.

Feeling extremely foolish, I intended on shoving these cards in a drawer, (and most likely pulling them out when I felt the need to chastise myself over something silly). But since I went to the effort of writing up instructions and creating a third card to complete the set, I thought I'd "publish" them myself.


And if you feel at all interested in reading the instructions, I've put them in a pdf for easy download.

Pure Innocence Card Set

You can download this from Google Docs HERE.


Thanks for visiting.  :-)


Photobucket

Art Journal - Gratitude

Oh dear, I'm late with my art journal again.  *blush*

I got busy playing with my new Distress Stains last night.  They'll be available soon from Craft-A-Lot, and they are so good!

Now this week the theme was Gratitude.  My pages don't look like that's what it's about, but the inspiration for it is.


Many of you would know about my battle with PND.  It's been over four years now, and I'm getting glimpses of seeing the light at the end of the tunnel.  I'm not there yet, it's a work in progress, but I'm grateful for even being able to see a glimmer of hope. For a long, long time I didn't think I'd ever feel good again.  The quote I've used is from Unity and it pretty much says the kind of thing that I'm constantly trying to tell myself.  To just be.

Ironically, these pages aren't finished.  Much like my journey.  So I think I'll leave them like this.  For the moment, anyway.  :-)


Materials:
Stamp sets - Unity - Just Be, PTI - Fancy Flourishes
Cardstock - Watercolour paper
Inks - Memento Tuxedo Black, Distress Stains in Antique Linen, Broken China, Faded Jeans, Wild Honey, Walnut Stain
Accessories - water spray


Photobucket

Thursday, August 11, 2011

Pencil Toppers... Or Finger Puppets!

When I saw this tutorial for pencil toppers on One Crafty Mumma, I knew I had to have a go using some of the gorgeous felt I just got from Sew Sweet.  My daughter Olivia wanted me to make them so they could be used as finger puppets too, so I just left out the part about gluing it to the pencil.  Too easy.


I used my Big Shot and my Sizzix Circles die to cut the shapes - I can't cut an even circle to save myself!  And they were glued together with my hot glue gun.  Apart from some embroidery thread that I had in my stash, I used products from Sew Sweet - felt in Bright Orange and Fuschia, and buttons in Lovely Lilacs.  Olivia thinks they're pretty fabulous.  And that's all that matters!  :-)


Photobucket

Tuesday, August 9, 2011

Paper Smooches August SPARKS Challenge

I'm posting this card because I'm reasonably happy with the colouring I did.  I don't particularly like the finished card though!


Materials:
Stamp sets - Paper Smooches Berry Digi Stamp
Cardstock - White Cambric Linen, Whisper White, Crumb Cake, Early Espresso
Inks - Whisper White, Prismacolor pencils
Accessories - OMS, blending stumps, PTI woodgrain impression plate, Big Shot, Nestibilities, dimensionals


Photobucket

Little Dreamer Amelia

Hi there!  I have a quick card share today, it's for The Greeting Farm Which One Wednesday Sketch 9.  I used Amelia from Little Dreamer, in my attempts to improve my hair colouring!  I have quite a few (read LOTS) of discarded versions of this.  I just couldn't get the colours to blend well for me.  *sigh*  I'll get there... eventually!


Thanks for stopping by!

Materials:
Stamp sets - The Greeting Farm Little Dreamer
Cardstock - Whisper White, Crumb Cake, Chocolate Chip, White Cambric Linen, SU DSP
Inks - Black Memento, Prismacolor pencils
Accessories - Cherry Cobbler Seam Binding, PTI Woodgrain Impression Plate, OMS, Blending stumps, Natural Kraft Button Twine and Hot Chocolate Mixed Buttons (Sew Sweet


Photobucket

Monday, August 8, 2011

A Little Sewing... With Thanks To MADE

Hello!  Today I thought I'd share a few other things I've been up to lately - sewing pants for Olivia.  In my blog surfing travels, I came across a BRILLIANT blog called MADE.  If you're into sewing at all, you need to check out this blog.  Dana has brilliant tutorials, easy patterns to use, and loads of wonderful tips.  So I found myself wanting to have a go at Dana's 
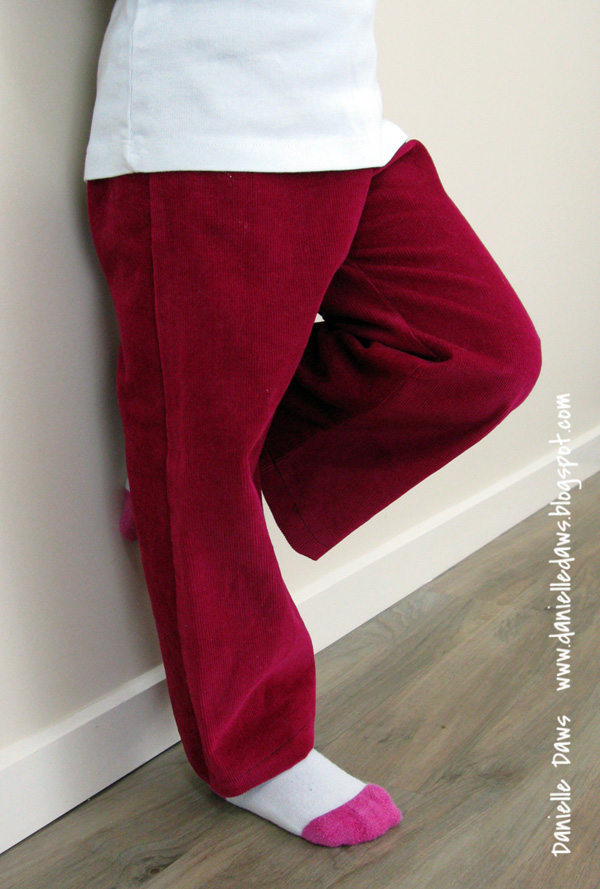
Kid Pants with a Flat Front Tutorial (it also utilises the Basic Kids Pants Tutorial).  Can I just say... O.M.G... these are SO easy to make!  And costing a whopping $3-4 dollars per pair to make in corduroy, I think I'll be making these again!

The first pair I sewed, I used the pattern as is, adding an extra inch for length.  The pattern is designed for a US size 2-3 toddler, but since Olivia is a smallish 4 year old, I figured I'd try the pattern as is.  They're a perfect fit, but a little snug for her to get up properly by herself.  She still loves them though.  :-)


For the second pair, I decided to enlarge the pattern a little... but I did it a little too much!  They still fit, and she loves them, they're just not as polished as I'd hoped.  Not like the ones on MADE...


So for the next pair I'll be keeping the extra length, but not widening the pattern so much.  On the up-side?  I'm learning HEAPS and I love how EASY this pattern is!  I think I'll start looking at embellishments for the next pair.

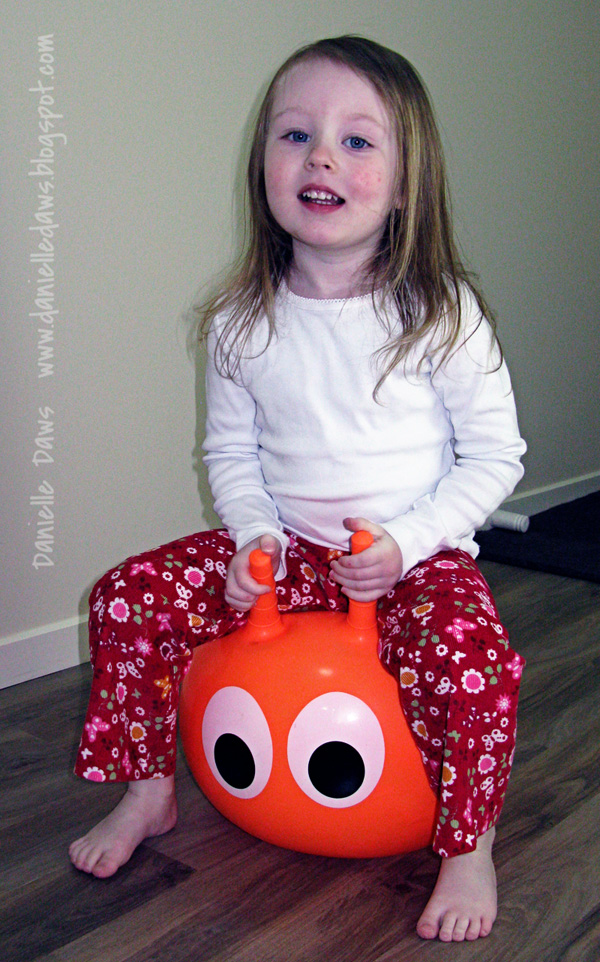
Of course, you can't wear corduroy pants without having a go on a retro space hopper... ;-)


I'll be sharing a few more of my sewing adventures soon.  Hopefully someone finds them useful!!


With thanks to


Photobucket